

I bet nothing beats the serenity a developer enjoys while sleeping peacefully at night knowing their code won’t break on production. But it’s only as ideal as it sounds. This is because when your code is out there in the wild, it’s fighting battles with users you’ve never thought existed and cases that you couldn’t have possibly even dreamt of.
The downside of a production issue on your Frontend can have direct implications on your business and customers. So while you can’t always write bug free code, you can always write air-tight tests to prevent your buggy code from reaching production in the first place.
Shiprocket is growing at an incredible rate, both in terms of the product and technology. As more popular brands start trusting us with their shipping needs, our growing team of engineers found it absolutely necessary to introduce code coverage and unit testing for our Frontend application. But how did we set up unit testing for our application? How did we implement the code coverage workflow? How did we decide it was worth the efforts, time and investments?
In this post, I’ll answer the above questions for you and walk you through everything you need to know about Frontend unit testing and code coverage.
Should you be bullish on Testing?
If writing and setting up tests was so easy, we probably wouldn’t be talking about it so proudly here. In fact, most developers and teams shy away from automated testing merely because they feel the time and efforts invested aren’t worth it.
They’re probably right, but only if they have analyzed this holistically with respect to their product, tech-stack and team. The first thing you need to understand about automated testing is the stronger you want it to be, the more time consuming it becomes.
Here’s a simple yet underrated evaluation criteria. How much time does it take a developer to fix a production bug in contrast to the time required to write and validate tests for that feature? Here’s another one. How many of those and similar bugs are prevented in the near future once that feature is wrapped with test cases?
For us, the problem was the growing product, frontend code, and engineers who’re contributing every now and then to release features rapidly. We didn’t want to wait for a time where we had no choice. We needed a testing workflow for our Angular application where every developer can test their own features in isolation with a coverage benchmark that had to be passed before their code can be merged in our codebase. However, at the same time, we wanted it to be a relatively quick process.
The Testing Pyramid
So we agreed on introducing testing and code coverage in our workflow. Typically, there are three kinds of tests:
E2E
It stands for End to End testing. In this type of testing, the entire software or application is tested with respect to its interaction with external entities like a web service, data pipeline, etc. It’s the complex type of testing and is the most difficult and time consuming to set up and implement.
Integration testing
Integration testing allows developers to test complete features or standalone modules of the application. It’s simpler and takes less time than E2E, but overall is still relatively complex and time consuming.
Unit testing
It’s the easiest to setup, simple and to implement and is the least time consuming process. Unit tests govern individual UI elements or components of a feature, module or a page (if we’re talking about single page applications).
Testing Pyramid Graphic
All types of tests are important, but in this post we’ll focus on how we introduced unit testing in our application.
Set up Unit Tests in an Angular Application
Good for us, Angular comes pre configured with Jasmine and Karma to support unit testing out of the box. Thus we didn’t have to do any additional manual setup.
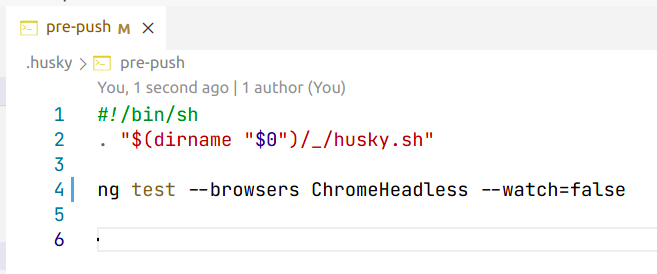
However, to automate the testing process, we took the help of git hook. Here we use Husky for running our pre-commit and pre-push hooks. After setting hooks, every time a new code is pushed, it’s tested against the written unit test cases. Here’s how our pre-push hook looked like:
But what impact did writing unit tests have on our product and application? Let’s take a deeper dive into some of our unit tests and our thought process.
Insights of our Unit Tests
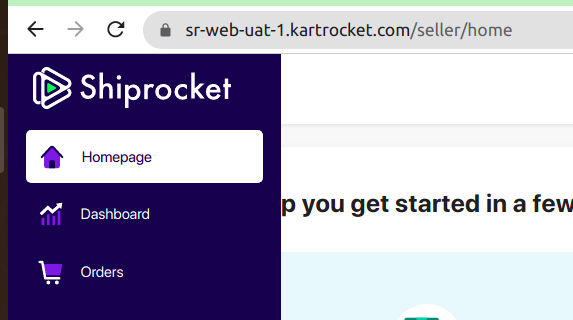
The most convenient way to use Shiprocket is on a laptop or desktop. Here’s how that looks like:
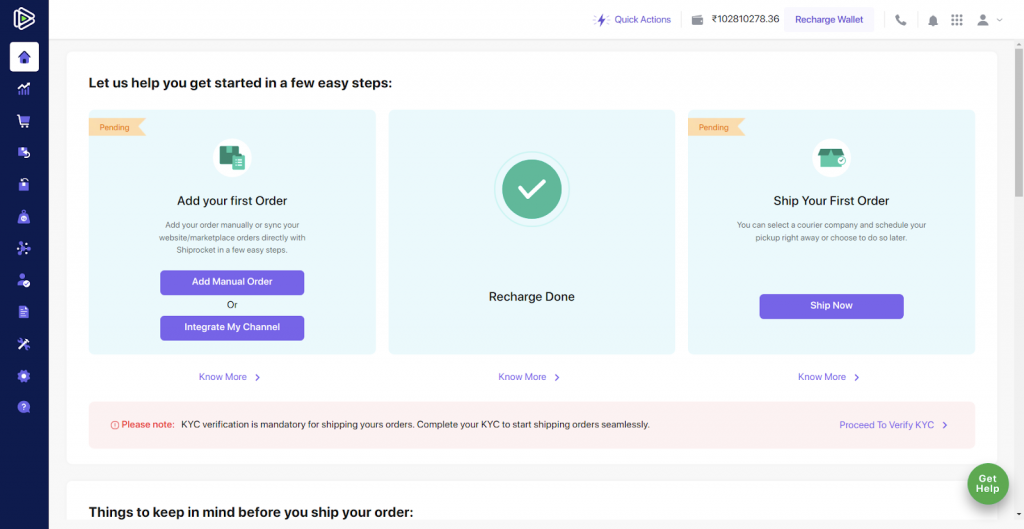
But at the same time, any seller can also access their seller panel on their mobile device.
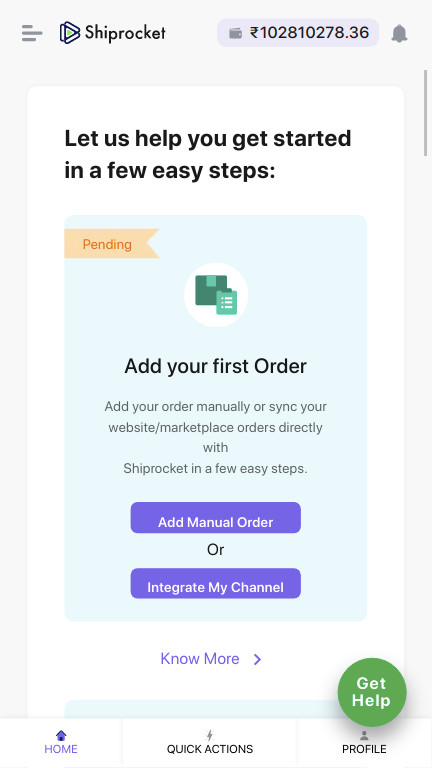
Notice that the mobile view has a quick navigation bar at the bottom, that’s absent from the desktop view. That’s just good UX practice, but we made this implementation fool proof by writing a unit test for this.
Test Case: Bottom navbar should only be visible on mobile not on desktop view.
So now the above test case would ensure that the bottom navigation bar is completely visible on mobile devices and it’s hidden on medium to large screens or desktop devices. Here’s a glimpse of that test case:
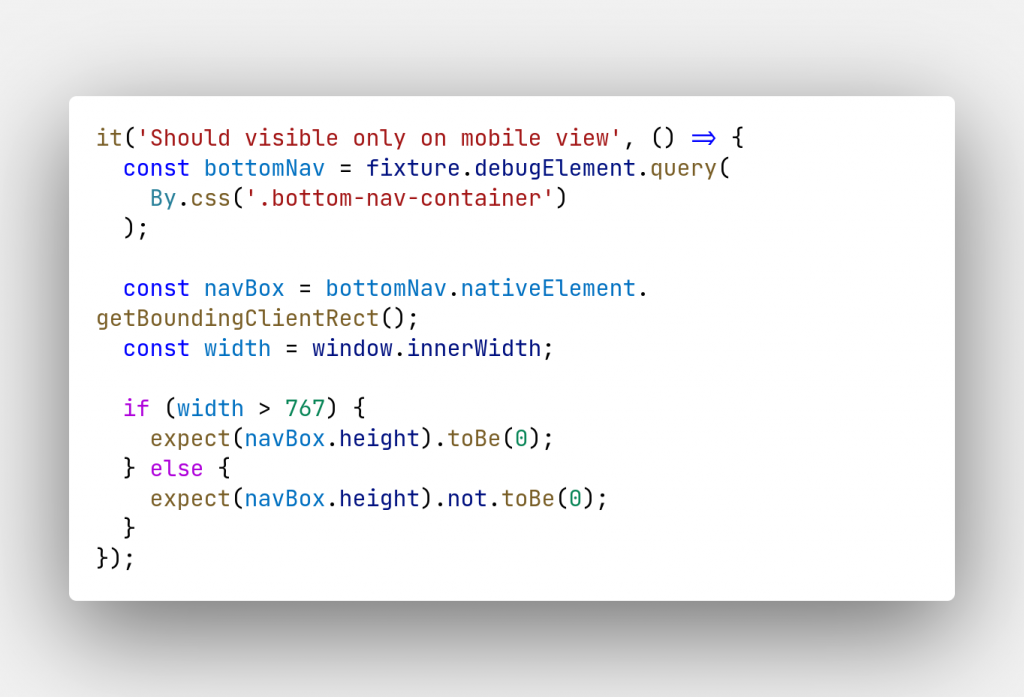
Our breakpoint here is 767 pixels. Anything beyond that should hide the bottom navbar. Anything less than that, should show the bottom navbar. To validate the visibility of the navbar, we check it’s height to be zero or non-zero in these conditions.
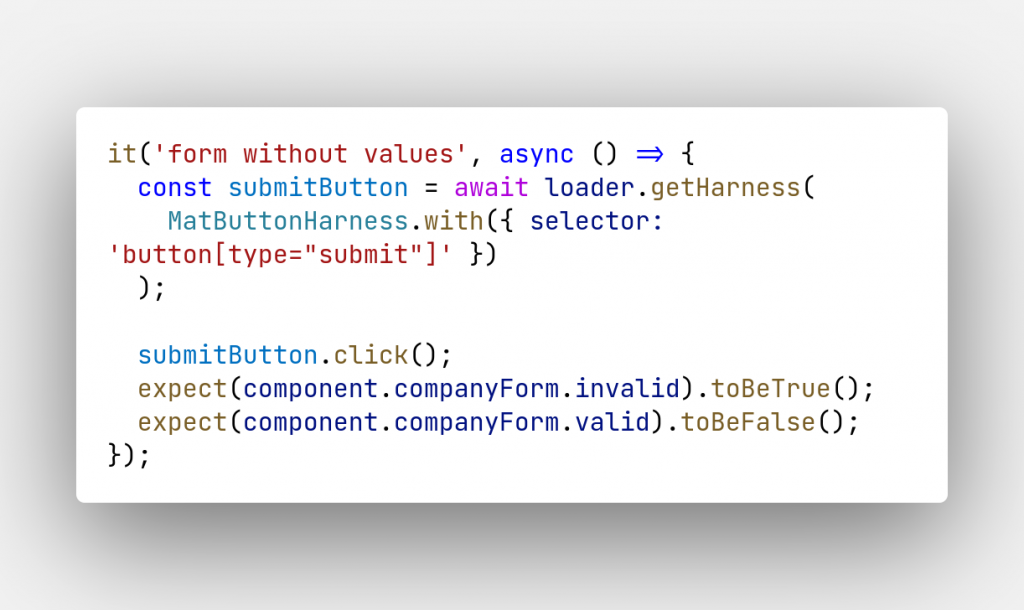
Test Case 2: A form without values, should be invalid
Here’s a common scenario most front-end folks encounter. Form validations! Frontend forms are bound to have validations to optimize API based validations, prevent unexpected user flows and invalid form submissions.
For instance, take the case of the Form below:
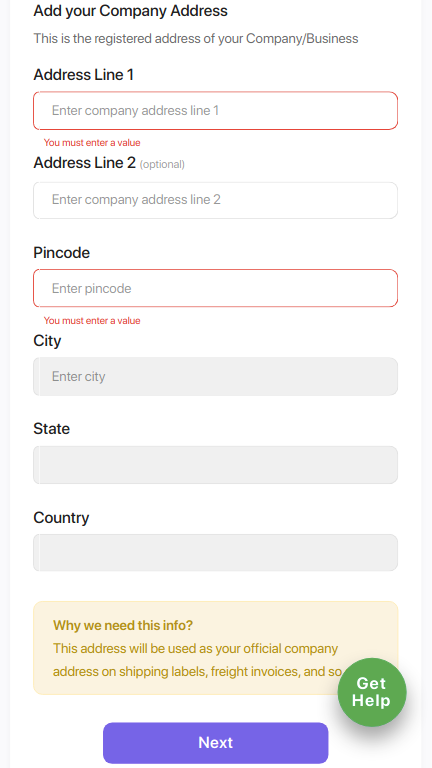
To check if at any instance the above form is invalid on submission, we can write a unit test as shown below:
Test Case 3: Button click should reflect the same url, as received from the API
Dynamic URLs are common in modern web applications. But when you embed dynamic URLs inside buttons, there could be some discrepancies with respect to the redirection. For example, what if a button’s missing the link and no redirection happens? This might leave your users confused.
An application as large as ours, there are tons of buttons and links with dynamic URLs. It would be a painstaking task to have all these buttons and links be tested every time a remotely related code is altered. So we wrote a unit test that took care of this, here’s what that looks like:

The above test ensures that once a button link with a dynamic URL from an API is clicked, the address bar in the browser is updated to navigate the user to that URL.
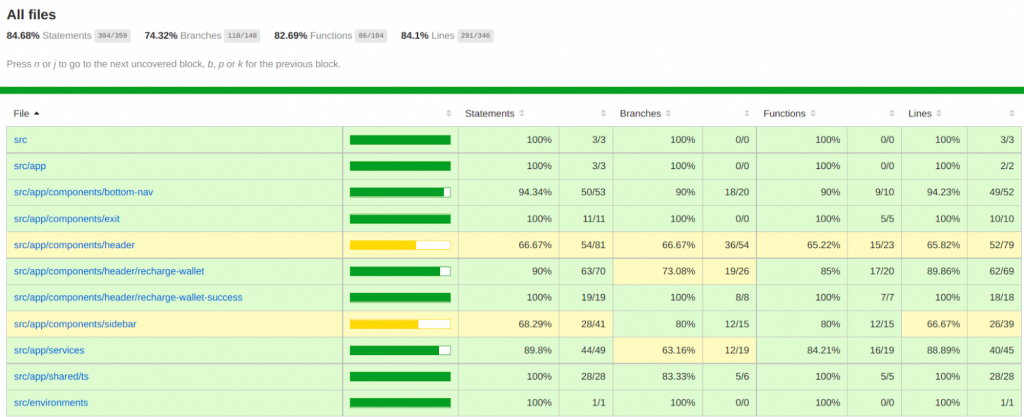
Code Coverage
Once we started writing unit tests, we introduced a test validation mechanism using code coverage. Code coverage provides a score of how many test cases our unit tests covers versus how many it should cover. Alongside the spec file Angular creates for every component, it also provides support for code coverage out of the box.
However, just like with unit tests, we wanted to set up an automated process where code coverage is evaluated before a developer pushes anything to the remote repository.
Code coverage checks the branches, functions, statements and lines in a file and calculates the test coverage for that file. This tells developers if they’ve written enough tests for a particular file or not. Further, we use this code coverage to determine if a developer’s code can be merged in the codebase or not.
For that, we set up pre-push hooks. This hook integrates with the git workflow and only allows a commit to be pushed to the remote repository if the commit has a code coverage of at least 80%. This automated workflow ensures that only that code which has passed all the tests with flying colors is merged with our codebase.
Benefits of Unit Tests and Code Coverage
Code quality and technical debt is often neglected within teams in the pretext of shipping features faster. With the help of unit tests and code coverage, we improved the quality of our codebase by a considerable margin. This is because code coverage gives us a strict workflow that has to be followed by every developer, no matter what. Unit tests ensure that any code a developer is pushing is thoroughly tested against some common test-cases.
Another major advantage we noticed was significant reduction in time to market for our features. It makes perfect sense as well, since our QA engineers now don’t have to bust their brains on testing even the smallest test cases. All in all, both QA and UAT testing speeds up and features go live faster!
Needless to say, production bugs have been minimal ever since we fully adopted unit tests and code coverage in our workflow.
Conclusion
We have started implementing unit tests and code coverage in other internal as well as external projects here at Shiprocket. We’re also doing a number of other things to improve code quality of our frontend codebase like linting and prettier. In fact, we’ll be back with a post on that soon, until next time!